评论区插件
约
2
分钟阅读
(
484
个字
,
2
张图片
)
阅读
切换到原始 Markdown 内容
主题使用 gitalk。
如果需要开启 gitalk,在 _config.linen.yml 中加入以下配置:
_config.linen.yml1
2
3
4
5
6
7
8
9
10
11
12
13
14
15
16
| comment:
type: gitalk
client_id: ****
client_secret: ***
repo: ***
owner: ***
admin:
- ***
per_page: 20
distraction_free_mode: false
pager_direction: last
create_issue_manually: false
proxy: https://cors-anywhere.lynanbreeze.workers.dev/?url=https://github.com/login/oauth/access_token
flip_move_options: null
enable_hotkey: true
language: zh-CN
|
配置指南
以下内容引用自 Icarus用户指南 - 用户评论插件
登录GitHub并点此注册一个新的OAuth应用。
填写”应用名称“(Application name),”应用主页“(Homepage URL),”应用描述“(Application description)。
然后,在”认证回调地址“(Authorization callback URL)填写你的博客的根URL地址。
点击“注册应用”(Register application)按钮来跳转到应用详情界面。
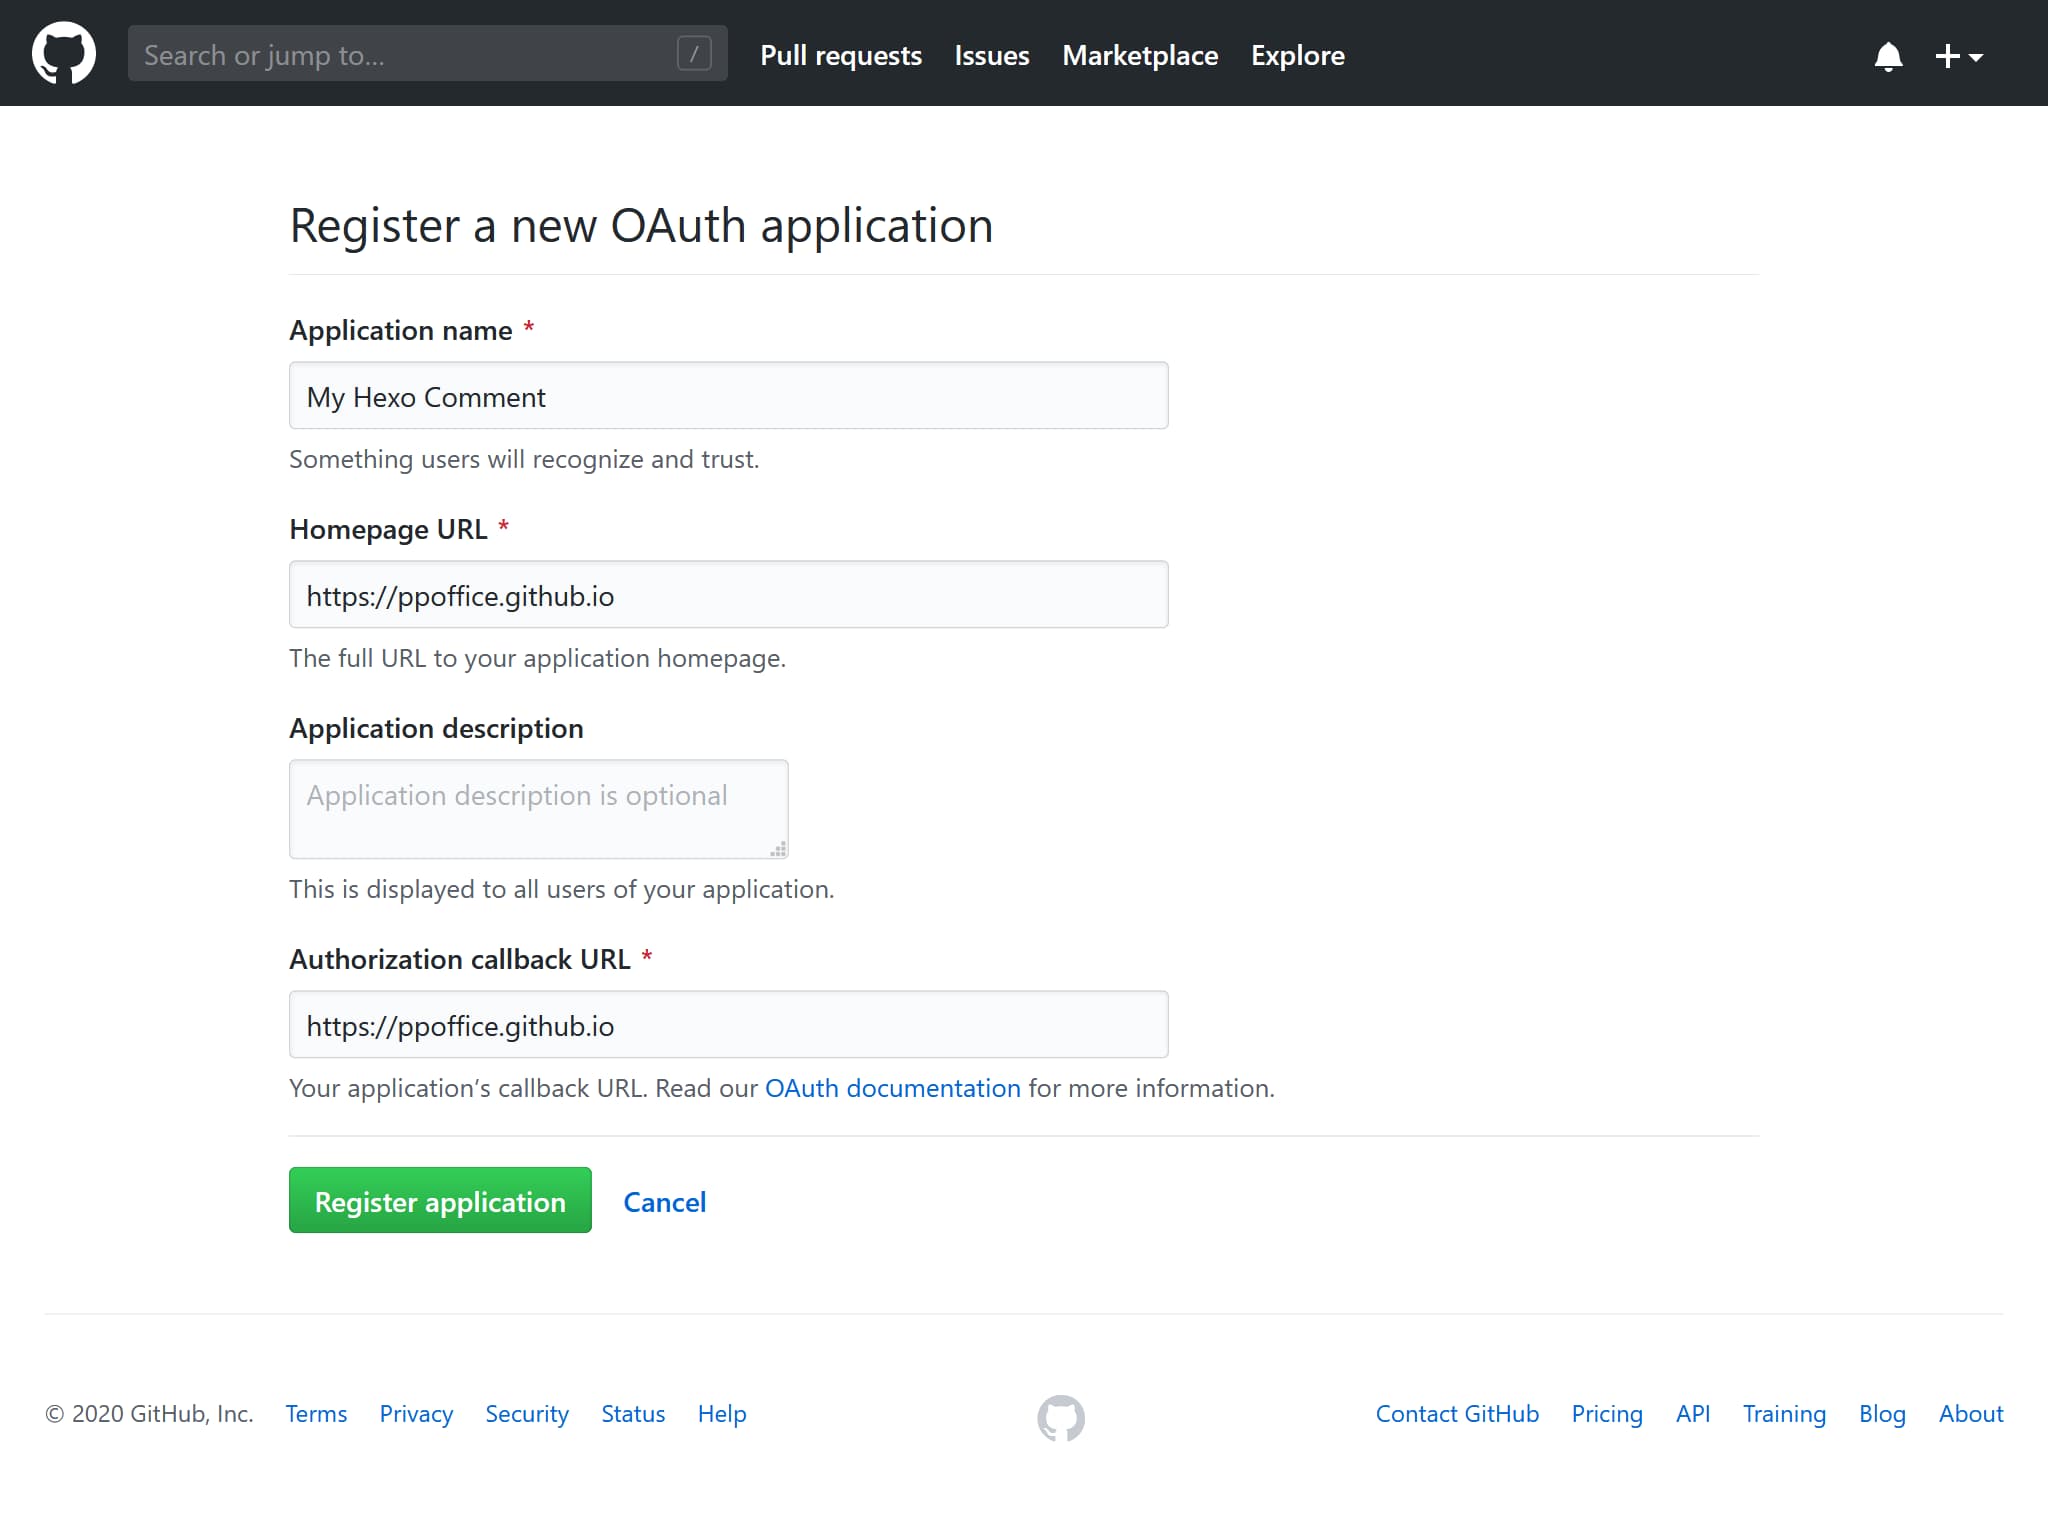 注册OAuth应用 - GitHub" "注册OAuth应用 - GitHub
复制”Client ID“与”Client Secret“的值并填入主题配置的相应配置项中。
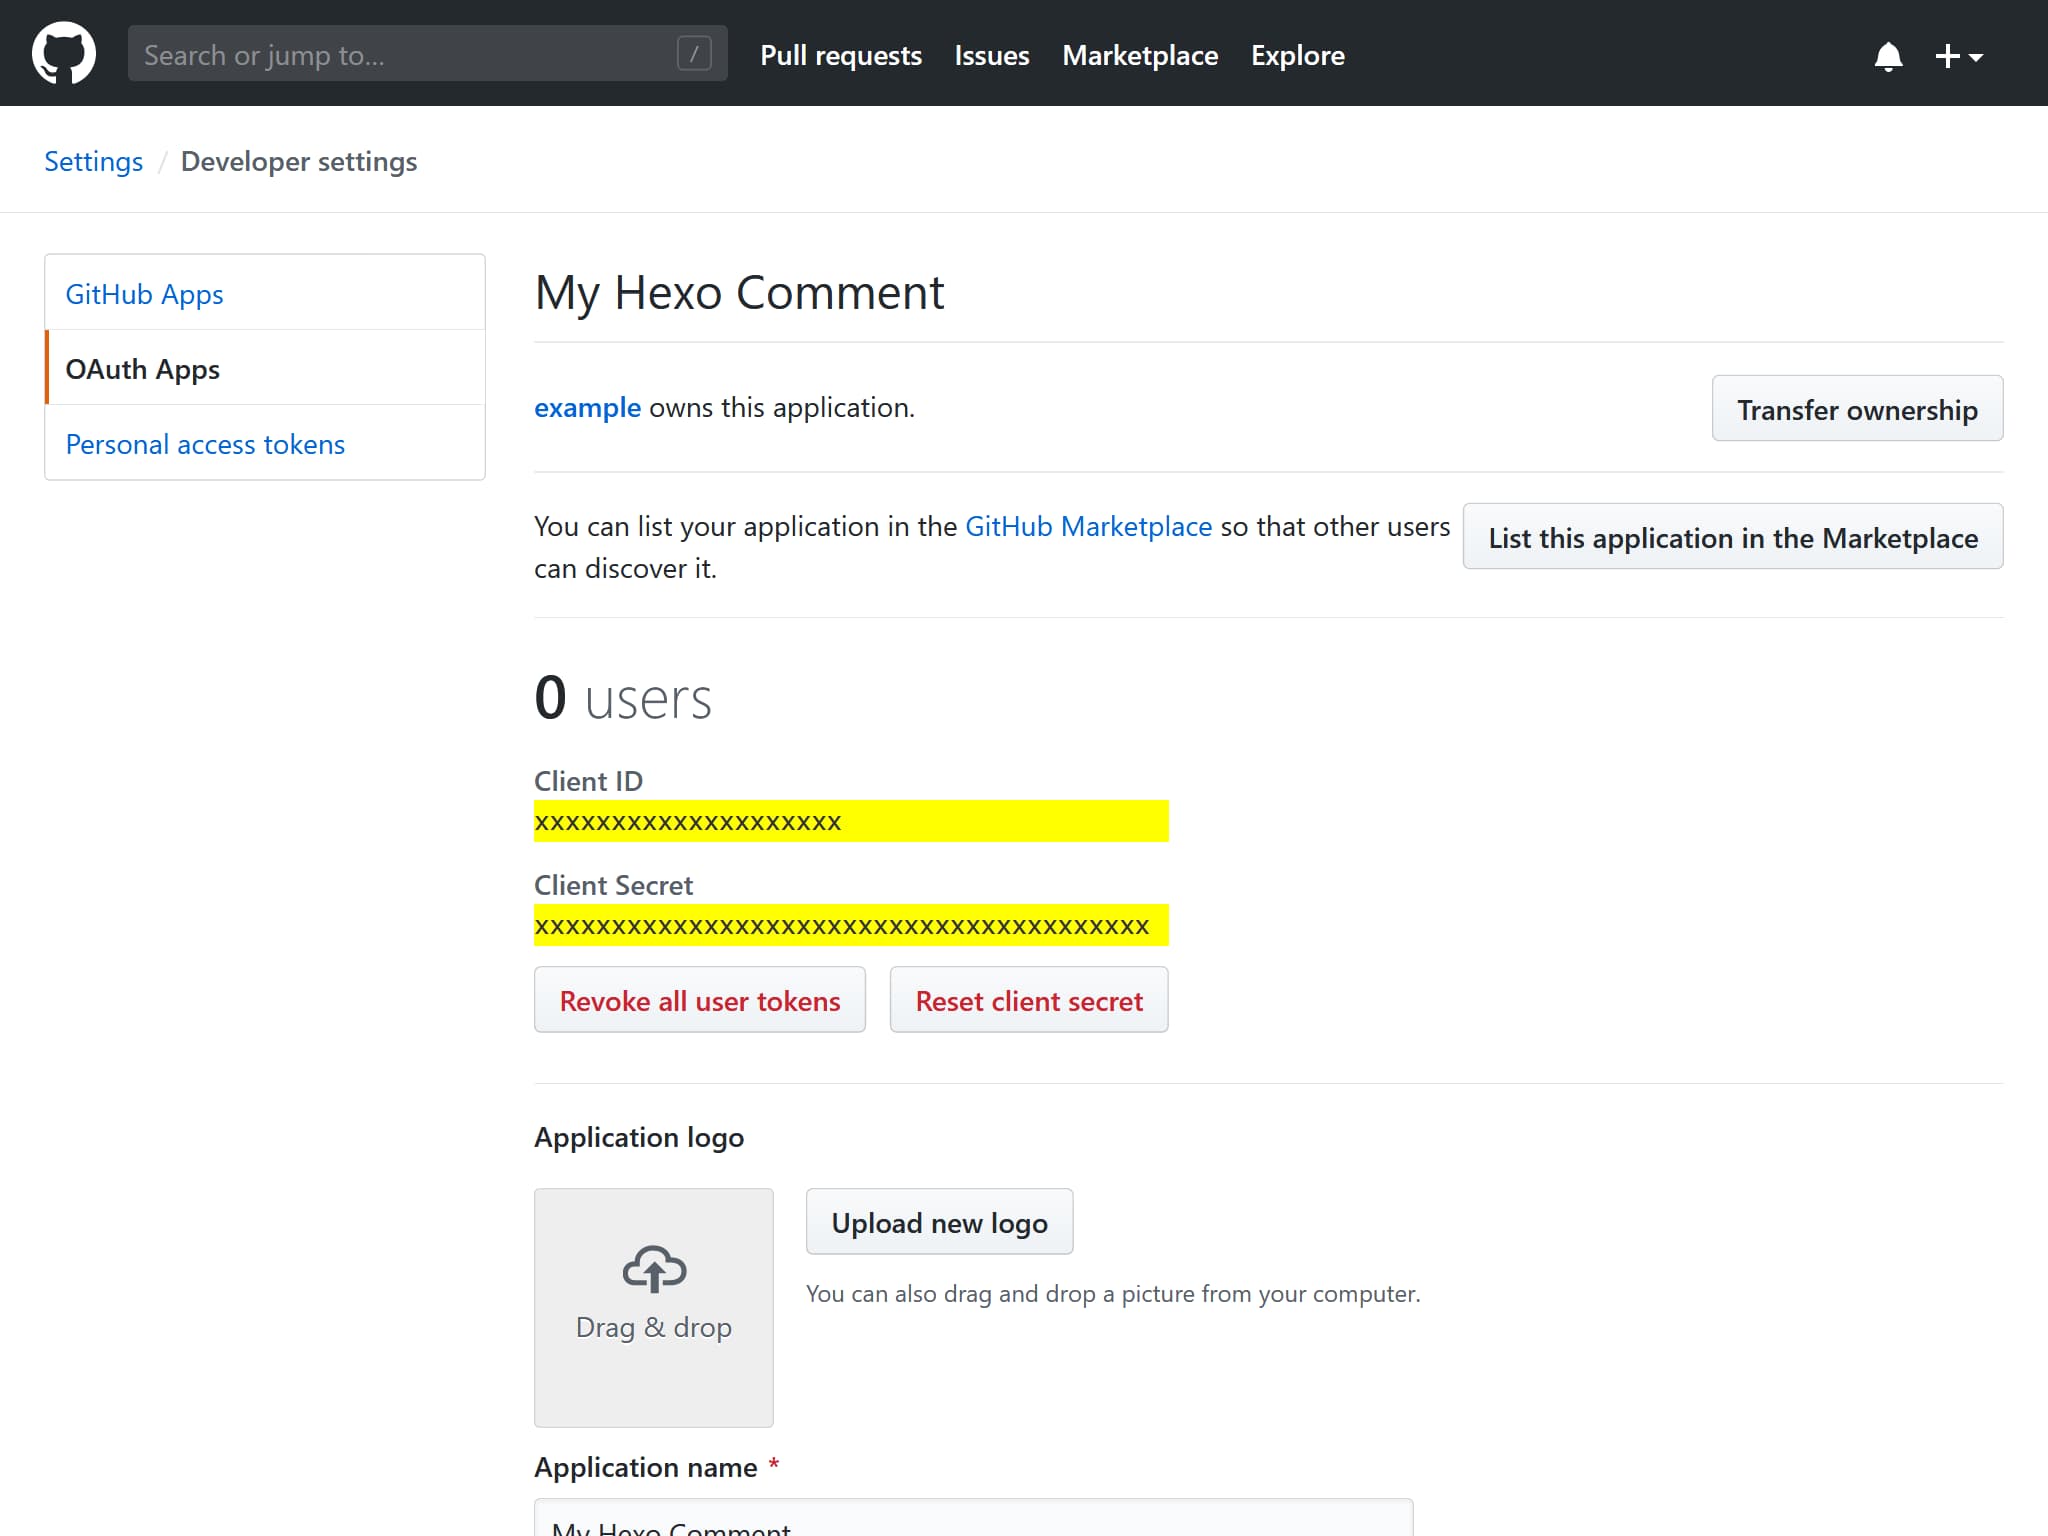 OAuth应用设置 - GitHub" "OAuth应用设置 - GitHub
例如,对于下面的”Client ID“和”Client Secret“:
GitHub OAuth应用1
2
3
4
| Client ID
xxxxxxxxxxxxxxxxxxxx
Client Secret
xxxxxxxxxxxxxxxxxxxxxxxxxxxxxxxxxxxxxxxx
|
对应如下的 Gitalk 的配置:
_config.linen.yml1
2
3
4
5
6
7
8
9
10
11
12
13
14
15
16
| comment:
type: gitalk
client_id: xxxxxxxxxxxxxxxxxxxx
client_secret: xxxxxxxxxxxxxxxxxxxxxxxxxxxxxxxxxxxxxxxx
repo: Some-of-Your-GitHub-Repo
owner: you_github_name
admin:
- you_github_name
per_page: 20
distraction_free_mode: false
pager_direction: last
create_issue_manually: false
proxy:
flip_move_options:
enable_hotkey: true
language: zh-CN
|
关于上述配置的含义和可选值,请参考 Gitalk文档 或 hexo-component-inferno。
1
2
3
4
5
6
7
8
9
10
11
12
13
14
15
16
17
18
19
20
21
22
23
24
25
26
27
28
29
30
31
32
33
34
35
36
37
38
39
40
41
42
43
44
45
46
47
48
49
50
51
52
53
54
55
56
57
58
59
60
61
62
63
64
65
66
67
68
69
70
71
72
73
74
75
76
77
78
79
80
81
82
| ---
title: 评论区插件
date: 2026-03-28 23:54
cover: /img/volodymyr-hryshchenko-V5vqWC9gyEU-unsplash.jpg
coverInfo:
author: Volodymyr Hryshchenko
url: https://unsplash.com/photos/three-crumpled-yellow-papers-on-green-surface-surrounded-by-yellow-lined-papers-V5vqWC9gyEU
series: 用户指南
appendRawMarkdown: true
tocType: flat
translations: ['en']
---
主题使用 [gitalk](https://github.com/gitalk/gitalk)。
如果需要开启 gitalk,在 `_config.linen.yml` 中加入以下配置:
```yaml _config.linen.yml
comment:
  type: gitalk
  client_id: ****
  client_secret: ***
  repo: ***
  owner: ***
  admin:
    - ***
  per_page: 20
  distraction_free_mode: false
  pager_direction: last
  create_issue_manually: false
  proxy: https://cors-anywhere.lynanbreeze.workers.dev/?url=https://github.com/login/oauth/access_token
  flip_move_options: null
  enable_hotkey: true
  language: zh-CN
```
## 配置指南
> 以下内容引用自 [Icarus用户指南 - 用户评论插件](https://ppoffice.github.io/hexo-theme-icarus/Plugins/Comment/icarus%E7%94%A8%E6%88%B7%E6%8C%87%E5%8D%97-%E7%94%A8%E6%88%B7%E8%AF%84%E8%AE%BA%E6%8F%92%E4%BB%B6/#Gitalk)
1. 登录GitHub并[点此注册](https://github.com/settings/applications/new)一个新的OAuth应用。
填写”应用名称“(Application name),”应用主页“(Homepage URL),”应用描述“(Application description)。
然后,在”认证回调地址“(Authorization callback URL)填写你的博客的根URL地址。
点击“注册应用”(Register application)按钮来跳转到应用详情界面。
<img style="max-width: 500px;" alt='注册OAuth应用 - GitHub" "注册OAuth应用 - GitHub' src="/hexo-theme-linen-doc-zh-CN/img/gitalk-register-application.jpg">
2. 复制”Client ID“与”Client Secret“的值并填入主题配置的相应配置项中。
<img style="max-width: 500px;" alt='OAuth应用设置 - GitHub" "OAuth应用设置 - GitHub' src="/hexo-theme-linen-doc-zh-CN/img/gitalk-application-settings.jpg">
例如,对于下面的”Client ID“和”Client Secret“:
```text GitHub OAuth应用
Client ID
xxxxxxxxxxxxxxxxxxxx
Client Secret
xxxxxxxxxxxxxxxxxxxxxxxxxxxxxxxxxxxxxxxx
```
对应如下的 Gitalk 的配置:
```yaml _config.linen.yml
comment:
  type: gitalk
  client_id: xxxxxxxxxxxxxxxxxxxx
  client_secret: xxxxxxxxxxxxxxxxxxxxxxxxxxxxxxxxxxxxxxxx
  repo: Some-of-Your-GitHub-Repo
  owner: you_github_name
  admin:
      - you_github_name
  per_page: 20                    # 可选填
  distraction_free_mode: false    # 可选填
  pager_direction: last           # 可选填
  create_issue_manually: false    # 可选填
  proxy:                          # 可选填
  flip_move_options:              # 可选填
  enable_hotkey: true             # 可选填
  language: zh-CN                 # 可选填
```
3. 关于上述配置的含义和可选值,请参考 [Gitalk文档](https://github.com/gitalk/gitalk) 或 [hexo-component-inferno](https://github.com/ppoffice/hexo-component-inferno/blob/0.2.1/src/schema/comment/gitalk.json)。
|